
Today’s DIY is one of my favorites ever. Recently inspired by my friend’s architecture studio, I’ve been on an industrial kick. Last week I made copper and steel candlesticks, and today I bring you cement coasters. Perfectly smooth & darling cement coasters.
– Rockite (a fast setting expansion cement; I tried it first w/another product, and they didn’t turn out the way I wanted)
– 2 tablespoon measuring spoons – one for the Rockite, one for the water (if water gets in the bag of powder, it will activate the chemicals)
– Plastic container for mixing cement (I used a yogurt container) – Stir stick (I used a plastic knife)– Mold for coasters (I used 6 cardboard soup containers from a local convenient store – they were nice and wide at the bottom; you could use yogurt/sour cream containers, a bucket, etc.)
– Paint (optional) – Elmer’s glue And then follow these simple steps:– Gather all your supplies and have them handy. Once you mix the cement, you have to be ready to pour within 10 minutes – it sets very fast!
– Mix the cement. I used about 13 tablespoons of Rockite and 5 tablespoons of water for two coasters. The neat thing about Rockite is that there is no perfect consistency – the thicker the cement, the stronger the coaster will be. My mixture felt like runny peanut butter.
– Pour the cement. I kinda guesstimated the amount of cement for each cup, but the above ratio (13 tbsp Rockite to 5 tbsp water) will make two nicely sized coasters.
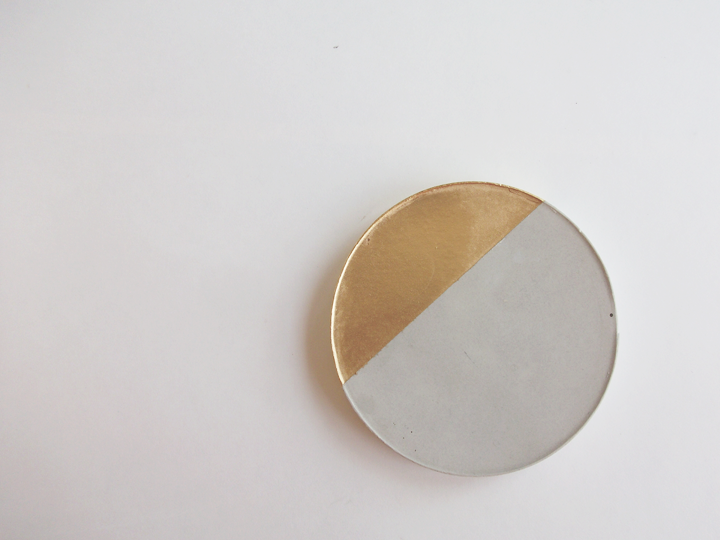
– Wait for cement to set. I waited about one hour, then gently but firmly squeezed the sides of the mold. Then, I turned the mold upside down and tapped on the bottom of the mold until the coaster slipped out. I was working over a rag so that the coaster landed on a soft surface. When your coasters come out, they will be a light grey. They eventually turn (after drying overnight) into this lovely whiteish cement.
– Gently sand edges until your coaster is just the way you like it. I ended up only sanding the top “lip” to make it less severe.
– If you feel like giving your cement coasters a dose of glamorous, tape off a region and then go wild with paint (I chose gold…I’ve kinda been obsessed with gold spray paint for months).
– Cut a circle of felt for the underneath side. Glue felt to coaster using Elmer’s glue. The felt will prevent the cement from scratching surfaces.
– Enjoy your coasters. They are perfect for entertaining, for giving as a gift, for decorating your home, etc.
Let me know if you make these – I’d love to see. Also, if you have any questions about the process, please let me know!
Happy May, friends!
Rebecca
These turned out great! I love that there could be so many customizations and iterations of this project!
This is AWESOME! Such a cool idea! You could make trivets or even a cake stand!! So cool!Erin and Jenny, stop reading my mind 😉 Standby for some other cement DIYS very soon….I think it's my new favorite supply 😉
Oh I love this!! They turned out perfect! So creative Rebecca! I really like how these turned out. Pinning. 🙂 I LOVE these! Especially with the gold spray paint. They're so cool!I've only just recently started reading your blog, but I've already decided that you've got THE best DIYs. So good! Want to try this. Maybe make placemats? Just need to find the right mould
Very rustic and adorable. I love the idea of adding spray paint for a pop of color! xoxo,Hi Donna! So very sorry about the lack of instructional photos – I'll email you in just a minute with some photos of the process. 🙂 Thanks for stopping by!
Could you please email me photos too? I would like to make them for my boyfriend for his birthday. I LOVE this idea!! 🙂 really want to try this. great for gifts too. mlle norvegienne Coolest ever! Love these, Rebecca!I love these!! I'm thinking of making my own stepping stones. Does the mold material matter as far as what will the cement stick to and what it won't stick to?
My mind is beginning to spin with possibilities!
Thanks so much!
Hi Vickie! Stepping stones sound incredible (if you make them, send me a pic!)! I think the material just needs to be somewhat flexible (think: plastic or lined cardboard – which is what I used) in order to gently loosen the cement from the mold, without breaking the mold or cracking the cement. The mold shouldn't absorb the cement either. I think a 5 gallon plastic bucket would probably work well for the stepping stones!
We've used disposable pie pans for stepping stone molds, though something a little deeper would be better, I think. They sell plastic molds especially for this at AC Moore, so you'd probably find them elsewhere.
These are so brilliant! I love them and I love your brain for thinking of them! haha. Simple and lovely and a great combination of contrasting materials. I'm totally going to give these a try once I'm through finals. 🙂
Anonymous says:Dear Rebecca, cement is only the power substance, when it hardens it is concrete.
I have been in the concrete business for 35 years, just thought you would like to know the difference. Linda
Actually @Anonymous, that is not true. Cement does NOT turn into concrete when it hardens. Hardened cement is just hard cement. Concrete is the COMBINATION of cement AND an aggregate – typically sand or gravel or sand and gravel. When you combine sand, gravel, cement and water, you make concrete. If you use regular cement WITHOUT an aggregate, you end up with a weak product with no tensile strength. The combination of all items give the finished product, concrete, strength. However, without that aggregate – you do NOT have concrete – even if you do have cement and water! Cement is nothing more than an ingredient. http://www.cement.org/basics/concretebasics_faqs.asp
Anonymous says:Do these absorb the condensation from your beverages if you leave them unfinished? We live in a very humid climate. Love the idea!
I'm in NJ which can be relatively humid, and I haven't had any trouble with the concrete absorbing the condensation… There are a few marks on mine now, but I kinda like the look!
I Brilliant idea. I'm going to have to make some for myself.
Kathy! Your concrete vs. cement explanation has made the MOST sense of all the explanations I've heart! Thanks for clarifying 🙂
Anonymous says:where did you get those paper containers. i cant find them. i tried to get them from a few restaurants and they wouldnt sell them to me.
Great question!! I found mine at Quick Chek…a local convenience store. They were the cups they sell soup in…when I asked if they'd sell just the cups, the manager told me to take as many as I needed…. Do you have a local convenience store? Or maybe Costo or Sams?
Anonymous says: ill check sams, costco doesnt have any. i guess i will also try to go frozen yogurt store I'm going to use lids from pint ice creams. Such a great idea, Patty! Anything around that shape will work!I love this idea! I'm going to try this and and might end up making them as a favors/escort cards for my wedding. (Wish me luck!) If it's as easy as you make it sound, the next step would be figuring out how to label them (with names and table numbers). Suggestions?
Micholgirl says:having boys, and wanting to do an all homemade Christmas, I was thinking of gathering up stones that they have collected or shells we have gathered from traveling and putting them in the cement, would that work?
I think it'd work – especially if your mold is large enough! I think it might be best to do an outer circle along the perimeter of the coaster, rather than filling up the entire coaster. That way, your cups will still be flat!
Such a good idea! They simple and hardy at the same time!Great idea! One could add a drop or two of food coloring to the water to make pastel coasters. I'm going to do "beach" colors. Thanks so much for the tutorials!
Patty, that's a fabulous idea – I might have to make another batch just to have colors now 🙂 Love this. I will definitely have to try it myself!What a great idea! I assume the untreated cement absorbs some condensation, no? So many coasters just collect the condensation and end up sticking to the glass or wetting the table anyhow. Thanks for sharing! http://www.thesitsgirls.com/get-paid-blogging
Hi! What a GREAT project!! The kids and I made these (with painted chevron, polka dot, etc. patterns) as a housewarming gift, and I blogged pics (with a link to your tutorial, of course!) here: http://jamiezanotti.com/blog/diy-concrete-coasters/ Thanks bunches for the inspiration + how to! :0)
Jamie! I love your coasters … great idea to paint geometric patterns 🙂 Thanks for providing the link – it's such fun seeing other's take on my diys 🙂
Anonymous says:after the rockite cured my coasters had tiny black spots on the surface that smudged when touched.
any thoughts on what went wrong…
thanks
Hmm, strange! Hasn't happened over here, so I'm not sure what it could be. For how long had they been drying when they smudged? Did they come in contact w/something…like a bug? Did you try using a very fine sandpaper to sand off the smudges?
Anonymous says:yes, very strange. the coasters were dried over night. i used sandpaper, but the flecks were at different levels so sanding didn't help. as i sanded, the black dots continued to smudge across the rockite. i decided to open a second bag of rockite, but i had the same problem. when i mixed up batch number 2, i took note that black specks were in the mixture. if i pressed a plastic spoon against them they would break up a bit, streak and then mix into the rest of the cement. there were too many black specks to do this throughout the wet mixture. i have asked a few friends who have experience with cement projects, but so far no one has any clue what is going on. i may try calling rockite. thanks……………
Anonymous says:I made some of these and they are so fun, but they tend to shed a bit. Like little crumbles of cement will just come off and leave a dust. Did yours do that?
Very informative. Great topic you have discuss here, I am very impressed your work, Keep up the good job…
Really its a wondering type of information about Curing Compound for Concrete is renovate here to satisfying all curing process.This is one of the regular pannel expanded by the building contractors and use frequently.
Anonymous says: what kind of paint can i use? can i just use acrylic or does it have to be spray paint?? Anonymous says:Rockite is not hazardous but it is VERY much not food safe. Ladies and gentlemen please do not put your spoons or food on these coasters.
I think appreciated content about fashion outfits, I love all these outfits suggestions. I put an effort in when I need to stop by the school.
new bridal dress
I love these!! I'm thinking of making my own stepping stones. Does the mold material matter as far as what will the cement stick to and what it won't stick to?
My mind is beginning to spin with possibilities!
Thanks so much!
I LOVE this idea :3 what kind of paint can i use? can i just use acrylic or does it have to be spray paint?
I ABSOLUTELY love this!! I'm bookmarking this post for sure! Thanks for the great tutorial!These look fantastic. Do you need to apply a sealer over the paint so it doesn't wear off or scratch?
Thanks so much for stopping by! I didn't apply a sealer, but a spray-sealer might be a good idea & layer of protection!
[…] If you are a little nervous about working with concrete, here is a good place to start. A simple circle mold and just a little bit of concrete can produce a set of lovely simple coasters for your coffee table. You can also go the extra mile and paint them or cover part of them in gold leaf. (via A Daily Something) […]